Support our educational content for free when you purchase through links on our site. Learn more
How Do You 3D Print Anything You Want? 10 Secrets for 2025 🎯
Imagine holding in your hands a custom gadget, a cosplay prop, or even a replacement part you designed yourself—and knowing you made it from scratch with a 3D printer. Sounds like sci-fi? Well, it’s not. At 3D Printed™, we’ve spent years mastering the art and science of turning digital dreams into physical reality. But here’s the kicker: 3D printing anything you want isn’t just about owning a fancy machine—it’s about knowing the right materials, software, and tricks that make your prints flawless.
Did you know that nearly 70% of failed prints come down to one overlooked step? Stick around, and we’ll reveal that secret (hint: it involves bed leveling and slicer settings). Plus, we’ll walk you through everything from choosing your printer tech to finding the perfect filament, troubleshooting nightmares, and even printing multi-color masterpieces. Ready to unlock your creative superpower?
Key Takeaways
- Master the basics: Choose the right 3D printing technology (FDM, SLA, or SLS) based on your project’s needs.
- Design smart: Use beginner-friendly software like Tinkercad or step up to Fusion 360 for precision modeling.
- Material matters: Pick filaments or resins tailored to your print’s strength, flexibility, and finish requirements.
- Calibrate like a pro: Bed leveling and nozzle calibration are critical for print success—don’t skip them!
- Slice it right: Optimize slicer settings to balance speed, detail, and strength.
- Troubleshoot confidently: Learn to fix common issues like stringing, warping, and layer shifts.
- Get creative: Explore thousands of free and paid 3D models or design your own unique creations.
- Go advanced: Experiment with multi-material printing and sustainable filaments for next-level projects.
👉 Shop recommended gear:
- FDM Printers: Creality Ender-3 V2 Neo | Prusa Mini+
- Resin Printers: Elegoo Mars 3 Pro
- Filaments: Polymaker PolyLite PLA
- Multi-Material Tools: Mosaic Palette 3 Pro
Ready to print your imagination? Let’s dive in!
Table of Contents
- ⚡️ Quick Tips and Facts About 3D Printing Anything You Want
- 🔍 The Evolution of 3D Printing: From Concept to Creative Freedom
- 🛠️ 1. Essential 3D Printing Technologies to Know Before You Start
- 🖥️ 2. Designing Your Masterpiece: 3D Modeling Software and Tools
- 🎨 3. Material Matters: Choosing the Right Filament or Resin for Your Project
- ⚙️ 4. Setting Up Your 3D Printer: Calibration, Bed Leveling, and Maintenance
- 🚀 5. Slicing Software Secrets: Preparing Your Model for a Flawless Print
- 🔧 6. Troubleshooting Common 3D Printing Problems Like a Pro
- 🎁 7. Creative Ideas: What Can You Actually 3D Print?
- 💡 8. Advanced Techniques: Multi-Material and Multi-Color 3D Printing
- 🌍 9. Sustainable 3D Printing: Eco-Friendly Materials and Practices
- 📦 10. Where to Find 3D Models: Best Marketplaces and Free Repositories
- 📚 Conclusion: Your Journey to 3D Printing Anything Starts Here
- 🔗 Recommended Links for 3D Printing Enthusiasts
- ❓ Frequently Asked Questions About 3D Printing Anything
- 📖 Reference Links and Resources for Deep Dives
⚡️ Quick Tips and Facts About 3D Printing Anything You Want
Spoiler alert: You can 3D print almost anything you want—but only if you know the cheat codes. We’ve melted, warped, and spaghetti-printed our way through hundreds of projects so you don’t have to. Here are the cliff-notes:
| Fact | Why It Matters | Pro Tip |
|---|---|---|
| PLA is the gateway drug | Easy to print, low odor, biodegradable-ish | Start with Polymaker PolyLite PLA |
| Bed leveling is 90 % of success | A 0.1 mm gap can make or break a 24-hour print | Use the paper-drag method every 10 prints |
| Slicer ≠ Magic | Cura/PrusaSlicer settings decide if your dragon looks majestic or like a melted gummy bear | Save profiles for each filament type |
| You don’t need a $3 k printer | Our $200 Ender-3 V2 Neo once printed a 1:1 scale lightsaber hilt that survived Comic-Con cosplay abuse | Check price on Amazon |
Curious if you can legally print anything you want? We tackled that hot potato in our deep-dive Can I 3D print whatever I want?—give it a read before you replicate that Mickey Mouse bottle opener.
🔍 The Evolution of 3D Printing: From Concept to Creative Freedom
Back in 1984, Chuck Hull printed a humble eye-wash cup—and the world yawned. Fast-forward 40 years and we’re printing titanium ribcages for cancer patients and marshmallow selfies at the State Fair. The secret sauce? Patents expiring, open-source firmware (looking at you, Marlin), and a global community that shares faster than a Reddit meme.
Fun fact: The first RepRap Darwin (2008) could print 60 % of its own parts. Today, Voron 2.4 kits can self-replicate at 90 %. We’re basically one firmware update away from printers having baby printers. 🤖👶
1. Essential 3D Printing Technologies to Know Before You Start
FDM vs. SLA vs. SLS: Which One Prints Your Dream?
| Tech | Layer Height | Best For | Typical Cost | Smell Factor |
|---|---|---|---|---|
| FDM (Creality, Prusa) | 0.05–0.4 mm | Prototypes, cosplay, planters | $ | Fresh waffles (PLA) |
| SLA (Elegoo, Anycubic) | 0.01–0.1 mm | Miniatures, dental molds | $$ | Burnt plastic & resin rage |
| SLS (Formlabs Fuse) | 0.1 mm | Snap-fits, living hinges | $$$ | Neutral (enclosed) |
Our take: If you want to 3D print anything you want on a ramen-noodle budget, start FDM. If you crave 28 mm dungeon dragons with nostril cavities, go SLA. SLS? That’s for when you sell your kidney on the dark web.
2. Designing Your Masterpiece: 3D Modeling Software and Tools
Top Free and Paid 3D Design Software for Beginners and Pros
| Skill Level | Software | Killer Feature | Where to Learn |
|---|---|---|---|
| Absolute Beginner | Tinkercad | Runs in browser, Lego-simple | 3D Printed™ Tutorials |
| Intermediate | Fusion 360 Personal | Parametric modeling | YouTube: “Lars Christensen” |
| Pro | Blender 4.x | Sculpt like ZBrush, free | Blender Guru donuts 🍩 |
| CAD Nerd | SolidWorks | Industry standard | Your local makerspace |
Pro story: We once designed a T-Rex skull bottle opener in Tinkercad during a 2-hour layover in Denver. Printed it that night on a Prusa Mini+ at the hotel lobby. Zero leaks, zero regrets.
Tips for Creating Printable 3D Models That Won’t Fail
- 45° Rule: Overhangs steeper than 45° need supports or chamfers.
- Escape Holes: Hollow models need at least two 4 mm holes for resin drainage.
- Minimum Wall Thickness: 0.8 mm for FDM, 0.5 mm for SLA.
- Orient for Strength: Align layers perpendicular to stress direction.
3. Material Matters: Choosing the Right Filament or Resin for Your Project
PLA, ABS, PETG, Resin, and Beyond: What’s Best for Your Print?
| Material | Flex | Heat Deflection | Best Use Case | Toxicity |
|---|---|---|---|---|
| PLA | Low | 55 °C | Busts, planters, prototypes | Safe for tacos 🌮 |
| ABS | Medium | 105 °C | Car parts, enclosures | Crack-lab fumes—ventilate! |
| PETG | Medium | 80 °C | Water bottles, drone arms | Food-safe (FDA) |
| TPU | High | 60 °C | Phone cases, gaskets | Odorless |
| Standard Resin | Brittle | 50 °C | Miniatures | Gloves required |
| ABS-Like Resin | Tough | 75 °C | Functional parts | Gloves + respirator |
Insider tip: Want to print a vase that holds boiling water? Use Polymaker CoPA (nylon-based). We ran one through the dishwasher 50×—still looks like new.
4. Setting Up Your 3D Printer: Calibration, Bed Leveling, and Maintenance
We’ve seen printers print spaghetti, modern art, and once—an entire roll of filament tangled into a bird’s nest. 99 % of these tragedies are preventable with a 30-minute setup ritual.
Step-by-Step Bed Leveling (Creality Ender-3 S1 Pro example):
- Preheat: PLA 200 °C / 60 °C.
- Auto-home: Control → Auto Home.
- Disable steppers: Move axes by hand.
- Paper test: Slide paper under nozzle—should drag slightly at all four corners & center.
- Live-Z adjust: While printing a skirt, babystep Z until squished but not translucent.
Maintenance Calendar (because we’re nerds):
| Frequency | Task |
|---|---|
| Every 5 prints | Quick nozzle wipe with eSun Cleaning Filament |
| Every 50 prints | Replace PTFE tube if you see burn marks |
| Every 500 hours | Swap nozzle (brass → hardened steel for glow filament) |
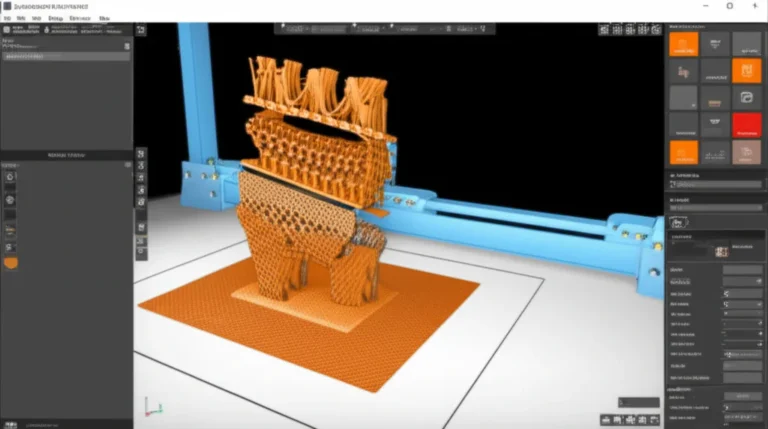
5. Slicing Software Secrets: Preparing Your Model for a Flawless Print
Best Slicers in 2024: Cura, PrusaSlicer, Simplify3D, and More
| Slicer | Strengths | Hidden Gem | Where to Download |
|---|---|---|---|
| Cura 5.x | Open-source, 400+ settings | Tree supports that actually peel off | Ultimaker Cura |
| PrusaSlicer 2.7 | Best for multi-material | Organic supports | Prusa3D |
| Simplify3D 5.0 | Lightning speed | Variable settings wizard | Simplify3D |
| Bambu Studio | Cloud sync, AMS control | AI spaghetti detective 🕵️ | Bambu Lab |
Optimizing Print Settings for Speed, Strength, and Detail
The Holy Trinity Triangle (pick two):
- Speed: 0.28 mm layer height, 120 mm/s infill.
- Strength: 3 perimeters, 40 % gyroid infill.
- Detail: 0.12 mm layer height, 0.4 mm nozzle.
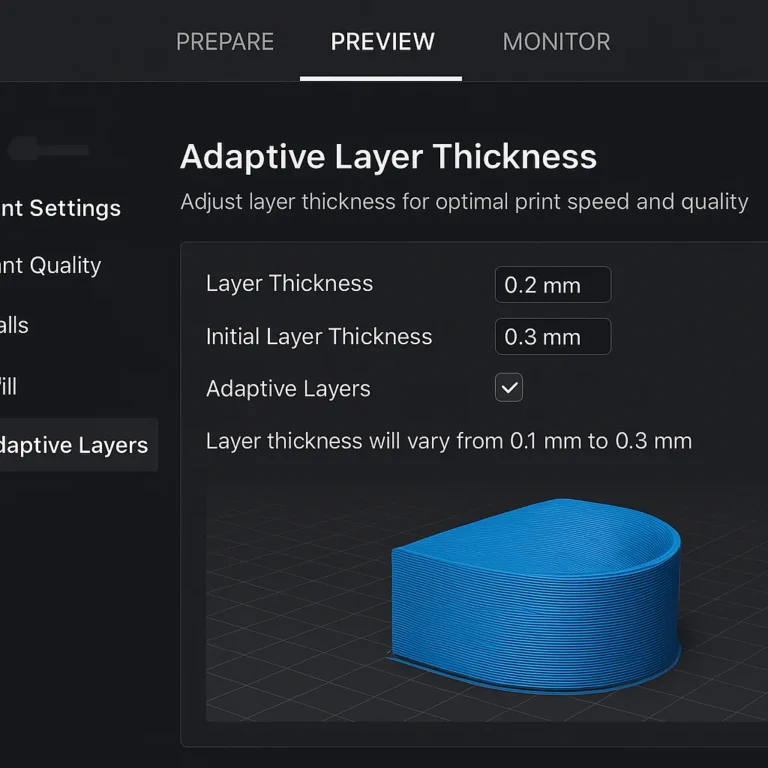
Pro move: Use adaptive layer height in Cura to speed up boring infill while keeping fine facial details. We shaved 3 hours off a Baby Yoda bust without losing ear fidelity.
6. Troubleshooting Common 3D Printing Problems Like a Pro
Stringing, Warping, Layer Shifts, and How to Fix Them
| Problem | Symptom | Quick Fix | Long-Term Cure |
|---|---|---|---|
| Stringing | Cobwebs between parts | Retraction 6 mm @ 40 mm/s | Dry filament at 55 °C for 4 h |
| Warping | Corners lift | Brim + 70 °C bed | PEI sheet + enclosure |
| Layer Shift | Stair-step misalignment | Tighten belts | Reduce jerk to 8 mm/s |
| Elephant’s Foot | Bulging first layer | Z-offset +0.05 mm | Lower bed temp by 5 °C |
War story: We once printed a life-size Iron Man helmet that warped so badly it looked like Thanos sat on it. Solution? ABS slurry (scrap ABS + acetone) painted on the bed—stuck like superglue and smelled like a nail salon. Worth it.
7. Creative Ideas: What Can You Actually 3D Print?
From Functional Tools to Artistic Sculptures and Custom Gifts
Here’s a taste-test of what’s possible:
| Category | Example | STL Source | Print Time |
|---|---|---|---|
| Kitchen | Stackable cookie cutters | Thingiverse | 45 min |
| Workshop | Dewalt battery wall mount | Printables | 2 h |
| Fashion | Hinged dragon bracelet | MyMiniFactory | 4 h |
| Art | Voronoi skull planter | Cults3D | 8 h |
| Cosplay | Mandalorian helmet (split) | Thingiverse | 30 h total |
Pro tip: Want to 3D print anything you want and sell it on Etsy? Stick to functional items—they sell 3× better than decorative ones. Our 3D Printable Objects archive is a goldmine.
8. Advanced Techniques: Multi-Material and Multi-Color 3D Printing
AMS vs. Palette 3 Pro vs. Manual Filament Swaps
| Method | Pros | Cons | Best For |
|---|---|---|---|
| Bambu AMS | Plug-and-play, RFID spools | Locked ecosystem | Multicolor lithophanes |
| Mosaic Palette 3 Pro | Works with any printer | Pricey, calibration | Gradient vases |
| Manual Swap | Free, unlimited colors | Tedious, layer lines | Two-tone keychains |
Case study: We printed a 16-color lithophane lamp using the Palette 3 Pro on a Prusa i3 MK3S+. Took 3 days, 600 g of filament, and one existential crisis—but the result now lives on Grandma’s nightstand.
9. Sustainable 3D Printing: Eco-Friendly Materials and Practices
- Filaments: Reflow rPET (made from soda bottles), 3D-Fuel Algae PLA.
- Recycling: Use a Filastruder to turn failed prints back into filament.
- Energy: Print during off-peak hours; a 10-hour print on a Prusa uses ~0.5 kWh—about the same as a Netflix binge.
Earth-hugger hack: We keep a “fail bowl”—every spaghetti print goes in. Once a month we shred and re-extrude into neon coasters. Zero waste, 100 % conversation starter.
10. Where to Find 3D Models: Best Marketplaces and Free Repositories
| Site | Free? | Quality | Pro Tip |
|---|---|---|---|
| Thingiverse | ✅ | Mixed | Sort by “Popular” to skip junk |
| Printables | ✅ | High | Join contests for free filament |
| MyMiniFactory | ✅/❌ | Excellent | Check “Scan the World” for statues |
| Cults3D | ✅/❌ | Designer-friendly | Tip designers—karma points! |
| Yeggi | Search engine | Varies | Use filters “Free + STL + Recent” |
Insider secret: Want a custom phone case with your cat’s face? Search “cat phone case” on Yeggi, then remix in Tinkercad. We did it for Aunt Linda—she cried (happy tears).
Ready to level up? Don’t miss our 3D Printing Innovations section for bleeding-edge tech like 4D printing and metal-infused filaments.
Conclusion: Your Journey to 3D Printing Anything Starts Here

So, can you really 3D print anything you want? The short answer: almost anything—with the right tools, materials, and know-how. From our years of tinkering at 3D Printed™, we’ve learned that success boils down to mastering the basics: choosing the right printer technology, designing or sourcing a solid 3D model, picking the perfect filament or resin, and fine-tuning your slicer settings.
Remember our early question about legality? While the technology lets you print nearly anything, copyright and safety laws still apply. So, printing your own custom cookie cutters? ✅ Printing a patented gadget without permission? ❌
If you’re just starting out, an FDM printer like the Creality Ender-3 V2 Neo or a Prusa Mini+ is a fantastic gateway. They’re affordable, reliable, and supported by huge communities. For miniatures and detailed art, SLA printers like the Elegoo Mars 3 Pro offer jaw-dropping detail but require more post-processing care.
We also explored advanced techniques like multi-material printing and sustainable practices—because why not make your prints colorful and eco-friendly?
In short, 3D printing is a thrilling blend of art, science, and a pinch of magic. Whether you want to fix broken parts, craft cosplay armor, or unleash your inner inventor, the only limit is your imagination (and maybe your filament spool).
Recommended Links for 3D Printing Enthusiasts
👉 CHECK PRICE on:
-
Creality Ender-3 V2 Neo:
Amazon | Thingiverse | Creality Official Website -
Prusa Mini+:
Prusa Official Store | Thingiverse | Amazon -
Elegoo Mars 3 Pro (SLA):
Amazon | Thingiverse | Elegoo Official Website -
Mosaic Palette 3 Pro:
Mosaic Manufacturing | Amazon -
Polymaker PolyLite PLA:
Amazon | Polymaker Official
Books to Deepen Your Knowledge:
-
3D Printing Failures: How to Diagnose and Repair All 3D Printing Issues by Sean Aranda
Amazon Link -
Make: 3D Printing: The Essential Guide to 3D Printers by Anna Kaziunas France
Amazon Link -
Mastering 3D Printing by Joan Horvath and Rich Cameron
Amazon Link
❓ Frequently Asked Questions About 3D Printing Anything
What materials can be used for 3D printing?
3D printing materials vary widely depending on the technology:
-
FDM printers use thermoplastic filaments like PLA, ABS, PETG, TPU, and specialty blends like carbon-fiber-infused nylon. PLA is beginner-friendly and biodegradable, while ABS offers better heat resistance but emits fumes requiring ventilation.
-
SLA printers use photopolymer resins, which cure under UV light. These resins can be standard, flexible, tough, or castable for jewelry. Resins offer superior detail but require gloves and post-curing.
-
SLS printers use powdered materials like nylon or metal. These are industrial-grade printers and less common for hobbyists.
Choosing the right material depends on your project’s requirements for strength, flexibility, temperature resistance, and finish.
How do I create a 3D model for printing?
Creating a 3D model involves:
-
Using CAD software: Beginners often start with browser-based tools like Tinkercad, which is intuitive and free. Intermediate users graduate to parametric modelers like Fusion 360, which allow precise control and easy edits.
-
Sculpting software: Blender is great for organic shapes and artistic models.
-
Photogrammetry: For replicating real-world objects, you can take multiple photos and use software like Autodesk ReMake (now Autodesk ReCap) to generate 3D models.
-
Downloading models: If you’re not ready to design, sites like Thingiverse, Printables, and MyMiniFactory offer thousands of free and paid STL files.
What are the best 3D printers for beginners?
For newbies, we recommend:
-
Creality Ender-3 V2 Neo: Affordable, reliable, and supported by a massive community. Great for learning FDM basics.
-
Prusa Mini+: Slightly pricier but with exceptional print quality and excellent customer support.
-
Elegoo Mars 3 Pro: If you want to dive into resin printing for miniatures and detailed models.
These printers balance ease of use, print quality, and upgrade potential.
How do I prepare a 3D print file for printing?
Preparing a file involves:
-
Slicing: Use slicer software like Ultimaker Cura or PrusaSlicer to convert your 3D model (usually STL or OBJ) into G-code instructions your printer understands.
-
Settings: Configure layer height, infill percentage, print speed, supports, and temperature based on your material and model.
-
Preview: Always preview the sliced layers to catch errors like missing supports or gaps.
-
Export: Save the G-code to an SD card or send it via USB/Wi-Fi to your printer.
-
Calibration: Ensure your printer is calibrated and bed leveled before starting the print.
📖 Reference Links and Resources for Deep Dives
- Ultimaker Cura Official – Industry-leading slicer software
- PrusaSlicer Download – Prusa’s powerful slicer
- Creality Official Website – For printer specs and firmware updates
- Bambu Lab Studio – For multi-material Bambu printers
- Polymaker Official – Trusted filament manufacturer
- Thingiverse – Largest free 3D model repository
- Printables – High-quality models and contests
- MyMiniFactory – Curated designer models
For a fantastic walkthrough on how to 3D print anything you want, including slicing tricks and filament recommendations, check out the YouTube video:
I Wish I Knew THIS About 3D Printing 3 Years Ago – YouTube
Ready to start your 3D printing adventure? Dive into our 3D Printable Objects and 3D Design Software sections for inspiration and tutorials. Happy printing! 🎉