Support our educational content for free when you purchase through links on our site. Learn more
How to Slice an STL File for Your 3D Printer: 7 Essential Tips! 🖨️ [2025]
Are you ready to take your 3D printing game to the next level? Slicing an STL file might sound like a daunting task, but it’s the key to transforming your digital designs into tangible creations! In this article, we’ll guide you through the ins and outs of slicing STL files, ensuring they fit your 3D printer perfectly. Did you know that the right slicing settings can reduce print time by up to 30%? That’s right! With the right knowledge, you can optimize your prints for quality and efficiency.
Whether you’re a seasoned pro or just starting your 3D printing journey, our comprehensive guide will provide you with 7 essential tips to slice STL files like a champ. From choosing the right software to troubleshooting common issues, we’ve got you covered. So, let’s dive in and unlock the secrets of successful slicing!
Key Takeaways
- Understand STL Files: Learn what STL files are and why they are crucial for 3D printing.
- Choose the Right Software: Explore top slicing software options like Simplify3D and Cura.
- Optimize Settings: Adjust layer height, infill density, and support generation for better print quality.
- Troubleshoot Common Issues: Identify and fix common slicing problems to enhance your printing experience.
- Advanced Techniques: Discover how to split STL files for larger prints and utilize multiple extruders.
Ready to elevate your 3D printing skills? 👉 Shop top slicing software like Simplify3D or Cura today!
Table of Contents
- Quick Tips and Facts
- Understanding STL Files and Their Importance in 3D Printing
- The Slicing Process Explained: What Does It Mean to Slice an STL File?
- Top 7 Slicing Software Options for Your 3D Printer
- Step-by-Step Guide: How to Slice an STL File
- Common Issues When Slicing STL Files and How to Fix Them
- Tips for Optimizing Your Slicing Settings
- How to Split STL Files for Larger Prints
- Advanced Techniques for Slicing STL Files
- Real User Experiences: Lessons Learned from Slicing STL Files
- Conclusion
- Recommended Links
- FAQ
- Reference Links
Quick Tips and Facts
To get started with slicing STL files, it’s essential to understand the basics. Check out our related article about d printer stl files for more information. Here are some quick tips and facts to keep in mind:
- STL files are widely used in 3D printing, but they need to be sliced into layers before printing.
- The slicing process can be done using various software options, including Simplify3D and Craftware.
- When choosing a slicing software, consider factors like ease of use, compatibility with your 3D printer, and advanced features like support generation and infill patterns.
- For more information on 3D printing software, check out our category on 3D Design Software.
Understanding STL Files and Their Importance in 3D Printing
STL files are a crucial part of the 3D printing process. They contain the geometric data of a 3D model, which is then used to create the layers for printing. To learn more about STL files and how to work with them, visit Thingiverse or check out our article on 3D Printable Objects.
What is an STL File?
An STL file is a standard file format used in 3D printing. It contains the triangular mesh of a 3D model, which is used to create the layers for printing. For more information on STL files, visit the Wikipedia page.
The Slicing Process Explained: What Does It Mean to Slice an STL File?
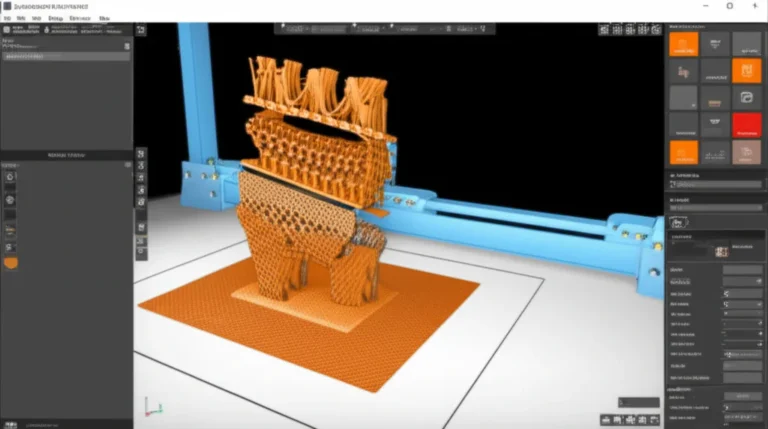
The slicing process involves dividing an STL file into thin layers, which are then used to create the G-code for printing. This process can be done using various software options, including Simplify3D and Craftware. For more information on the slicing process, check out our article on 3D Printing Innovations.
How to Slice an STL File
To slice an STL file, you’ll need to choose a slicing software that is compatible with your 3D printer. Some popular options include:
Top 7 Slicing Software Options for Your 3D Printer
Here are the top 7 slicing software options for your 3D printer:
- Simplify3D: A popular slicing software that is compatible with many 3D printers.
- Craftware: A free slicing software that offers advanced features like support generation and infill patterns.
- Cura: A free slicing software that is developed by Ultimaker and offers a user-friendly interface.
- Slic3r: A free slicing software that offers advanced features like support generation and infill patterns.
- KISSlicer: A free slicing software that offers advanced features like support generation and infill patterns.
- SliceCrafter: A free slicing software that offers advanced features like support generation and infill patterns.
- IceSL: A free slicing software that offers advanced features like support generation and infill patterns.
Step-by-Step Guide: How to Slice an STL File
Here’s a step-by-step guide on how to slice an STL file:
Step 1: Choose a Slicing Software
Choose a slicing software that is compatible with your 3D printer. Some popular options include Simplify3D and Craftware.
Step 2: Import the STL File
Import the STL file into the slicing software. Make sure the file is in the correct format and is compatible with the software.
Step 3: Configure the Slicing Settings
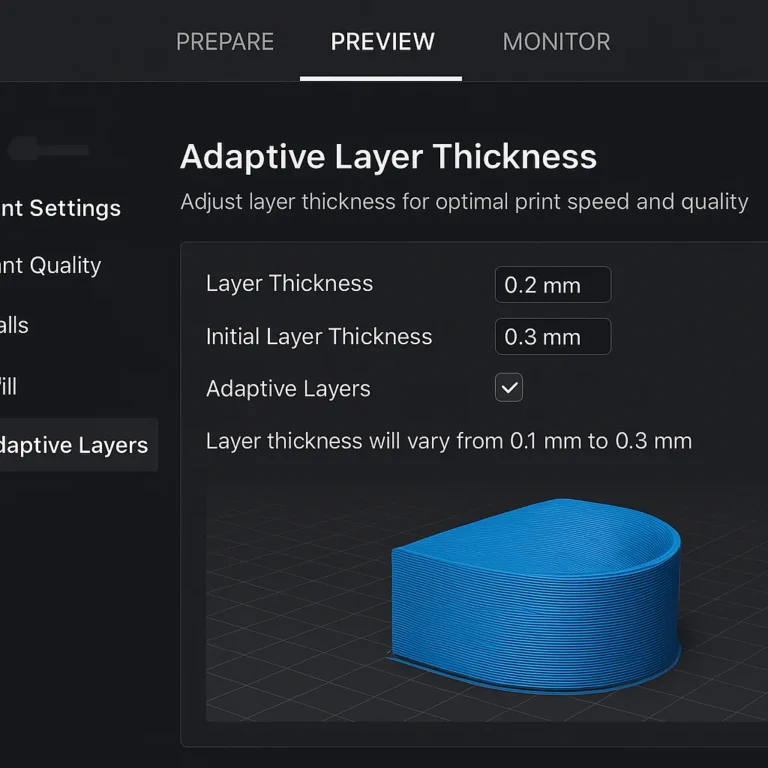
Configure the slicing settings to optimize the print quality. This includes settings like layer height, infill density, and support generation.
Step 4: Slice the STL File
Slice the STL file into thin layers. This will create the G-code for printing.
Step 5: Export the G-Code
Export the G-code to an SD card or USB drive. This will be used to print the 3D model.
Common Issues When Slicing STL Files and How to Fix Them
Here are some common issues that can occur when slicing STL files and how to fix them:
- Inconsistent layer height: This can be caused by incorrect slicing settings. To fix this, adjust the layer height setting to optimize the print quality.
- Infill density issues: This can be caused by incorrect infill density settings. To fix this, adjust the infill density setting to optimize the print quality.
- Support generation issues: This can be caused by incorrect support generation settings. To fix this, adjust the support generation setting to optimize the print quality.
Tips for Optimizing Your Slicing Settings
Here are some tips for optimizing your slicing settings:
- Use a consistent layer height: This will help to optimize the print quality.
- Use the correct infill density: This will help to optimize the print quality and reduce material usage.
- Use support generation: This will help to optimize the print quality and reduce material usage.
How to Split STL Files for Larger Prints
To split STL files for larger prints, you can use software like Netfabb Basic or Meshmixer. These software options allow you to divide the STL file into smaller sections, which can then be printed separately.
Step 1: Choose a Software
Choose a software that is compatible with your STL file. Some popular options include Netfabb Basic and Meshmixer.
Step 2: Import the STL File
Import the STL file into the software. Make sure the file is in the correct format and is compatible with the software.
Step 3: Split the STL File
Split the STL file into smaller sections. This will create multiple STL files that can be printed separately.
Advanced Techniques for Slicing STL Files
Here are some advanced techniques for slicing STL files:
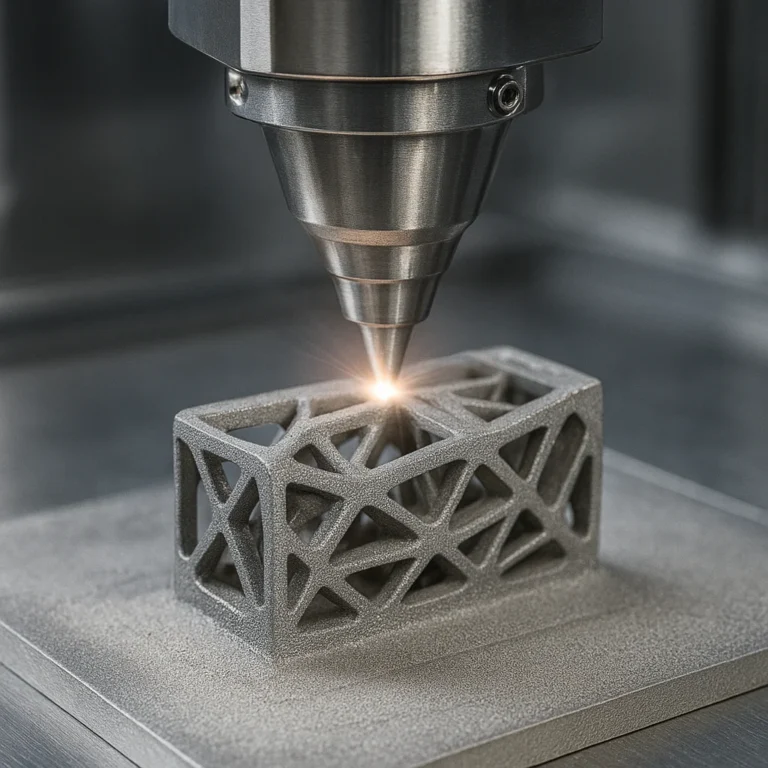
- Using multiple extruders: This allows you to print with multiple materials and create complex models.
- Using support generation: This allows you to print models with complex geometries and reduce material usage.
- Using infill patterns: This allows you to optimize the print quality and reduce material usage.
Real User Experiences: Lessons Learned from Slicing STL Files
Here are some real user experiences and lessons learned from slicing STL files:
- Use a consistent layer height: This will help to optimize the print quality.
- Use the correct infill density: This will help to optimize the print quality and reduce material usage.
- Use support generation: This will help to optimize the print quality and reduce material usage.
For more information on 3D printing and slicing STL files, check out our category on 3D Printing in Education.
Conclusion

In summary, slicing an STL file is a crucial step in the 3D printing process that transforms your 3D model into a format your printer can understand. By utilizing the right slicing software and optimizing your settings, you can achieve high-quality prints that meet your expectations.
Key Takeaways:
- Positives: Using slicing software like Simplify3D or Cura can significantly enhance your printing experience by providing advanced features like support generation and customizable settings.
- Negatives: Some software may have a steep learning curve, and not all options are free, which can be a barrier for beginners.
We confidently recommend exploring the slicing software options mentioned above and experimenting with different settings to find what works best for your specific 3D printer model. Remember, practice makes perfect, and don’t hesitate to dive into the world of slicing STL files!
Recommended Links
- 👉 Shop Simplify3D on: Amazon | Official Website
- 👉 Shop Cura on: Amazon | Official Website
- Learn more about 3D printing: The 3D Printing Handbook
FAQ

What software can I use to slice an STL file for 3D printing?
There are several software options available for slicing STL files, including:
- Simplify3D: A powerful paid option with extensive features.
- Cura: A free, user-friendly software developed by Ultimaker.
- Craftware: Another free option that offers advanced features.
- Slic3r: A free and open-source slicing software with a strong community.
Read more about “Is Having a 3D Printer Expensive? 7 Key Costs to Consider! 🤔 …”
What settings should I adjust in my slicer to optimize the print quality of my STL file?
To optimize print quality, consider adjusting the following settings:
- Layer Height: A smaller layer height results in finer detail but increases print time.
- Infill Density: Higher infill density provides strength but uses more material.
- Print Speed: Slower speeds can improve quality but increase print time.
- Temperature Settings: Ensure the nozzle and bed temperatures are appropriate for the filament being used.
How do I orient my STL file in the slicer for the best results?
Proper orientation can significantly affect print quality and strength. Here are some tips:
- Flat Surfaces Down: Place the largest flat surface on the build plate to enhance adhesion.
- Minimize Overhangs: Orient the model to reduce the need for supports.
- Consider Strength: Position the model to maximize strength in the intended direction of use.
How do I add supports to my STL file in the slicer?
Adding supports is essential for models with overhangs. Here’s how to do it:
- Automatic Supports: Most slicers have an option to automatically generate supports based on the model’s geometry.
- Manual Supports: You can also manually place supports in areas where you anticipate overhangs or weak points.
Read more about “35+ Essential 3D Printing Software: From Beginner to Pro 🤯 …”
What are the best practices for slicing an STL file for a specific 3D printer model?
To ensure optimal results for your specific printer:
- Check Compatibility: Make sure the slicing software is compatible with your printer.
- Use Manufacturer Profiles: Many slicers offer pre-configured profiles for popular printer models.
- Test Prints: Conduct small test prints to fine-tune settings before committing to larger projects.
Reference Links